null

Clothes Dryer Diagnostic Guide

Posted by AU Publisher on 22nd Oct 2013

(adsbygoogle = window.adsbygoogle || []).push({ google_ad_client: "ca-pub-3040563559864160", enable_page_level_ads: true });

Clothes Dryer  Diagnostic Guide.  Use the diagnostic chart to find out what is causing the problem with your clothes washing machine. Look up the symptom, and then review some of the possible causes. Follow the links from the possible causes to facilitate to the tutorials on how to repair the prob

Symptom


Click on underlined items for further course information


Dryer Venting & Installation Guidelines

      Check for  Brands

Laundry Tutorials-Library #D

Clothes Dryer Tutorials

Search For manuals

Most repairs to dryers(depend on brand) require that you remove the top and front (not the back or sides) to access the parts.

INSTALLING DRYER PROPERLY VERY IMPORTANT

The leading cause of home clothes dryer and washer fires was failure to clean (32%), followed by unclassified mechanical failure or malfunction (22%). Eight percent were caused by some type of electrical failure or malfunction

  • All dryer ducting must be a minimum of 4" in diameter. Clean, unobstructed, frictionless ducts encourage air flow efficiency,quickens drying times, adds longevity to clothing's life and reduces utility bills.            
  • Flexible transition hosVent Firee between the dryer and the wall outlet should be either the foil type or the aluminum flexible duct (most preferred). Do not use the plastic or vinyl. Concealed ducting must be rigid metal (galvanized or aluminum) duct. Duct joints shall be installed    so that the male end of the duct points in the direction of the airflow. Joints should be secured with metal tape (not duct tape). Do not use rivets or screws in the joint or anywhere else in the duct as these will encourage lint collection. Length of concealed rigid metal ducting shall not exceed 35 feet (25' for IRC). Deduct 5 feet from the allowable length for every 90 degree elbow and two and a half feet for every 45 degree fitting (the Dryer-Ell is an exception under 2006 IRC Section M1502.6, 2009 IMC Section 504.6.4 and 2009 IRC Section M1502.4). These lengths may vary per local codes and   dryer manufacturers recommendations. The maximum length of a clothes dryer exhaust duct shall not exceed 25 feet (7,620 mm) the dryer location to the wall or roof termination. The maximum length of the duct shall be reduced 2.5 feet or each 45-degree (0.8 rad) bend, and 5 feet (1,524 mm) for each 90-degree (1.6 rad) bend. The maximum length of the exhaust duct does not include the transition duct. Dryer venting shall be   independent of any other systems (chimneys or exhaust vents).                                                                                                          Courtesy of InterNACH                                                                                                                                                                                                      
    • Small orifice metal screening should not be part of the hood or roof jack as this will catch lint and block the opening in a very short time. The hood opening should point down and exhibit 12 inches of clearance between the bottom of the hood and the ground or other obstruction. Tip to make it easier to attach Aluminum Flex: Flatten aluminum flex with pipe like dough roller, click here to see image, then check out this video for some great tips. The importance of proper dryer venting can scarcely be overstated. From Dryer Vent Safety. Int'l Association of Certified Home Inspectors (InterNACHI).

Dryer does not work at all

Electric Shock can cause injury or death

warning-img.pngNever assume the electricity is off. Before servicing an electrical device, disconnect it from its electrical source either by unplugging the appliance, or turning off the power at the breaker fuse box. Mark the service panel with a note so that no one will restore power while you are working. After turning off the power to the circuit, test the circuit to be certain that there is no power before attempting service.

  • Make sure the dryer is plugged in securely                                                  
  • Check for a blown fuse or tripped circuit breaker
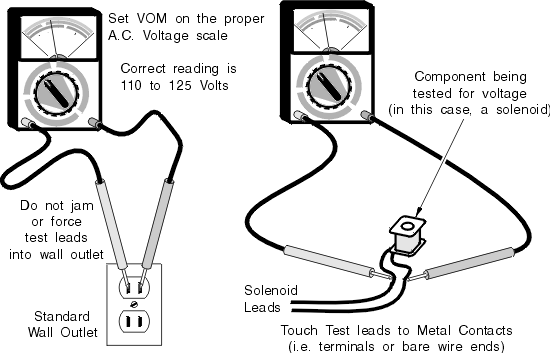
  • Test the power outlet for voltage / Use a voltmeter
  • Inspect the electrical cord for damage  
  • Eliminate use of an extension cord, if any is being used
  • Check the outlet voltage / by voltage meter
  • Test the door switch / For broken actuator / Test continuity of switch
  • Test the start switch / Test continuity
  • Test the thermal fuse / *Test continuity of fuse
  • Test the thermostats / *Test continuity
  • Test the timer Control / *Test for power in and out  
  • Test the motor /* test for power to  

Dryer tumbles, but there is no heat

        
  1. Admiral   - see: Maytag
  2. Amana
  3. Frigidaire Stackable   Dryer
  4. GE
  5. Hotpoint
  6. Kenmore-Sears
  7. Magic Chief - see Maytag
  8. May Tag - see Maytag
  9.  Maytag Newer Model see Whirlpool
  10. Whirlpool - Dryer
  11. Whirlpool - Duet Dryer
  12. Whirlpool - Newer Model
  13. Sears - see Kenmore
  14. Speen Queen


  • Check for proper air flow
  • Test the safety fuse or  thema fuse / *Test continuity of fuse
  • Test the thermostat  / *Test continuity of fuse
  • *Test the timer Control /  *Test for power in and out  
  • Test the centrifugal switch of motor  
  • Test the heating element  / *Test continuity

Laundry Tutorials-Library #D

Clothes Dryer Tutorials

Basic Electricity Instructionals  
Major Appliances Electrical FundamentalsUnderstanding Electricity, Test Instruments

Dryer takes too long / usually caused

Checking air flow and venting hose

  • There are over 15,500 fires caused every year by dryer vents.

  • If it takes more than one cycle to dry, you need to clean your dryer vent.

  • Dryer vents clogged with lint can cause dryers to work longer and harder, resulting in excess energy costs of $18 to $24 per month.

  • Clean the lint filter regularly to avoid a risk of fire.

While your dryer is still running, and before you disconnect its power supply, place your hand over the exterior vent while it is running. You should be able to feel a strong air flow. If the air flow is weakened at all, check the following areas:

Airflow restriction

General Trips: 

Airflow restriction is the problem causing long drying times. The ducting could be to long causing lint to build-up inside of ducting. Lint than will collect moisture causing a back pressure build-up, thus clothing will stay wet. 

Fabric-sheet film build-up on the lint filter  what causes dryer units to catch fire and potentially burn the house down." The best way to avoid these problems, is to take that filter out and wash it with hot soapy water and an old toothbrush (or other brush) at least every six months.

The duct can caked with lint. And once it is caked with lint can soak up the moisture become wet. This because all that water that came out of the wet laundry had to go somewhere, if it doesn't making it all the way outside. Staying inside the dryer, clothing or ducting, it can become so wet that water will dripping out of the duct at the joints, getting into the wood(wood-rot) and the back of the drywall, where it will start to grow black mold. All of this damage can add up to $10,00o dollars of damage. Worse a fire!

  • Check the lint trap & vent or ducting / clean out ducting or replace

When replacing ducting DO NOT USE VINYL PLASTIC DUCTING - FIRE HAZARD
  • Check for proper air flow

  • Inspect the vent ducting for kinks or dips / Dryer could be push back on the ducting causing airflow restriction

  • Test the heating element  / *Test continuity

  • Test the thermostat  /  *Test continuity  
  • Proper ducting below

General Information from  http://www.consumerreports.org

"Improper dryer vents are a much bigger and more common safety problem. Here are a few tips to keep your clothes dryer running safely and efficiently.

  • Use metal dryer ducts to help prevent dryer fires. Consumer Reports says that flexible dryer ducts made of foil or plastic are the most problematic because they can sag and let lint build up at low points. Ridges can also trap lint. Metal ducts, either flexible or solid, are far safer because they don't sag, so lint is less likely to build up. In addition, if a fire does start, a metal duct is more likely to contain it. See our  dryer venting safety report  for more tips as well as photos and a dryer-venting video.
  • No matter which kind of duct you have, you should clean it regularly. In addition, remove the visible lint from the lint screen each time you use your dryer. This not only will reduce the risk of a fire, but your clothes will dry faster and your dryer will use less energy. If dryer film is a worry, there is certainly no harm in occasionally cleaning the lint filter with warm soapy water and a small brush.
  • Clean inside, behind, and underneath the dryer, where lint can also build up.
  • Take special care drying clothes stained with volatile chemicals such as gasoline, cooking oils, cleaning agents, or finishing oils and stains. Wash the clothing more than once to minimize the amount of these chemicals on the clothing, and line dry instead of using a dryer.
  • Avoid using liquid fabric softener on all-cotton clothing made of fleece, terry cloth, or velour. In our flammability tests, liquid fabric softener added to rinse water accelerated the burning speed of these fabrics. If you want a softener, use dryer sheets instead.
  • Buy dryers that use moisture sensors rather than ordinary thermostats to end the auto-dry cycle. Thermostats can allow the dryer to run longer than necessary.
  • Occasionally wipe the sensor with a soft cloth or cotton ball and rubbing alcohol to keep it functioning accurately. Sensors are usually located on the inside of the dryer, just below the door opening, and can be hard to find. They are usually two curved metallic strips, shaped somewhat like the letter "C"."
  1. Amana
  2. Frigidaire Stackable   Dryer
  3. GE
  4. Hotpoint
  5. Kenmore-Sears
  6. MayTag
  7. Whirlpool - Calypso
  8. Whirlpool - Duet

Dryer drum does not tumble

Laundry Tutorials-Library #D

Clothes Dryer Tutorials

  • Check the drum belt
  • Check the idler pulley
  • Check Drum support rollers
  • Test the motor /  *Check for power to
           

Dryer overheats

Laundry Tutorials-Library #D

Clothes Dryer Tutorials

  • Check the lint trap & vent or ducting / See: Proper venting  Use metal dryer ducts to help prevent dryer fires  

  • Check for proper air flow  / Not properly vented

  • Check the thermostat /  *Test for continuity  

Dryer will not stop automatically

Laundry Tutorials-Library #D

Clothes Dryer Tutorials


  • Test the timer control*
  • Test the moisture sensor   / *Test for continuity  
  • Test the thermostat   /  * Test for continuity  
  • Check the lint trap & vent or ducting

Dryer is noisy

  1. Admiral   - see: Maytag
  2. Amana
  3. Frigidaire Stackable   Dryer
  4. GE
  5. Hotpoint
  6. Kenmore-Sears
  7. Magic Chief - see Maytag
  8. MayTag - see Maytag
  9.  Maytag Newer Model see Whirlpool
  10. Whirlpool - Dryer
  11. Whirlpool - Duet Dryer
  12. Whirlpool - Newer Model
  13. Sears - see Kenmore
  14. Speed  Queen
  • Level the dryer / usually not a problem

  • Check the drum belt - See all Brand / If belt is cracking

  • Check the drum support rollers - Most Brand

  • Check the idler pulley - See: all Brands

  • Check the glides - See: All brands

  • Check drum bearings   - SEE: General Electric Brands

  • Check the blower   - See: MayTag / If Blower spins freely on motor shaft replace

  • Check the baffles / coins caught under or inside the baffles, remove coins and reinstall baffles

Light won't turn on

  • Replace the bulb

  • Test the door switch / SEE: *Test for continuity

Dryer give clothes a bad odor

General Trips:

Check washer or clothes before put  inside washer. CLEAN OUT POCKETS

  • Check for proper air flow

  • Check the lint trap & vent or ducting

  • Remove odor producing items from the proximity of the dryer
  • Check for dead rodents in side of dryer  

Clothes are damaged or stained

General Trips:

Usually item brought in to the drying load, such as nuts left inside the pockets or cosmetics

  • Check the baffles for cracks or damage, or missing

  • Check the front and rear seals

  • Check the drum for rust or damage

Learn to use   Multimeters  

multimeter.gif

*Continuity test is the checking of an electric circuit to see if current flows in a solenoid, contact is made inside a switch or motor winding are good.(that it is in fact making a complete circuit). A continuity test is performed by devices that can be used to perform continuity tests include multi meters which measure current and specialized continuity testers which are cheaper, more basic devices, generally with a simple light bulb that lights up when current flows. SEE: Electrical Fundamentals Course

When a bad motor winding cannot be found by a physical inspection, many times an ohmmeter may show that there is a defective winding. Read more: How to Test Electric Motor Windings Ohmmeter usages. While the ohmmeter may not show potential failures,  it can be used to determine if the windings are good or bad.


Whirlpool  Duet  Dryer Diagnostic Instruction
  1. To check a Whirlpool Duet dryer's power cord is plugged completely into a working outlet. The dryer should not be in a cycle while you're performing diagnostics testing, and the indicator lights should not be illuminated.
  2. Locate the "More Time" and "Less Time" push buttons on the control console. These buttons are to the right of the selector switch and under the "Estimated Time Remaining" display screen.
  3. Press and release the buttons in the following sequence within five seconds: "More Time," "Less Time," "More Time" and "Less Time".
  4. Check that all of the indicator lights are illuminated and the "Estimated Time Remaining" display shows "88." If one or more of the lights are not illuminating, there is an issue with the unlit component or the circuit b

(adsbygoogle = window.adsbygoogle || []).push({});